


Table of Contents
Owners of Arturia’s widely popular Pigments VST rejoiced in unison in late January when the revered production company unveiled a new update.
As a synth, Pigments has been around for a while. But, Arturia has done something really unique with its development: they have never actually released a standalone new version, and all updates to it have been free for all who already own it. This update was no outlier: Pigments 6 is available now, and free for everyone who already owns Pigments.
I was not one of those people. I’ve actually never used Pigments, even though I’ve always been interested in giving it a try. At face value, it combines a visual interface (and, for someone who uses Serum heavily, that’s always nice) with a ton of oscillator types (analog, granular, wavetable, etc.) to act as an all-in-one sound design beast. And, with the sixth update freshly released, I figured now would be a great time to dive into Pigments.
The following is my honest review of the entire plugin, as well as a bit of information about what exactly is new in Pigments 6 for those of you who previously owned Pigments 5.
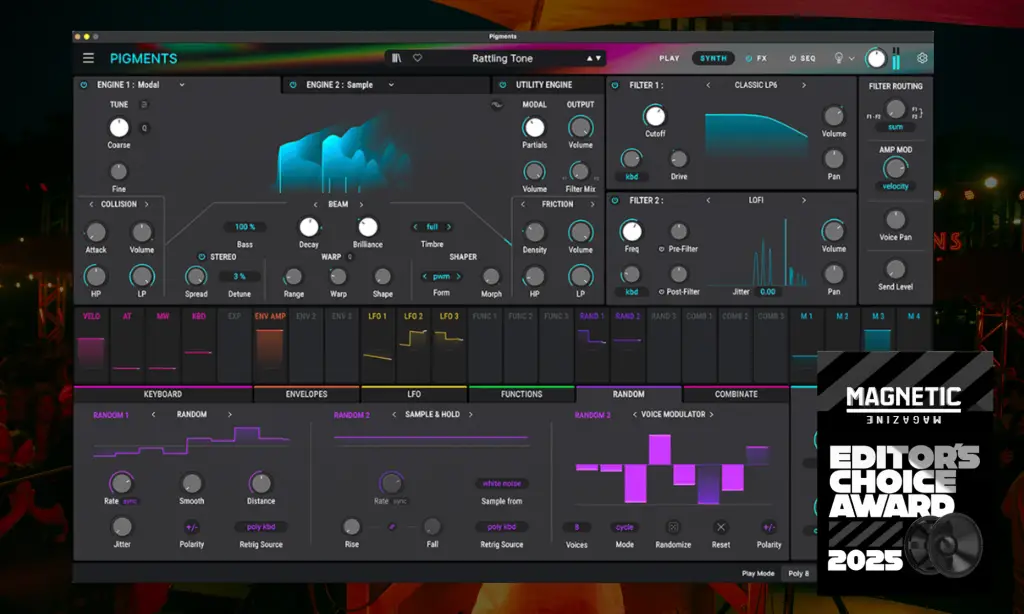
Editor’s Choice Award
New gear and iterations of existing products roll out in a steady stream of updates that can be hard to keep up with in the production space these days, and to be honest, with how few products actually reinvent the wheel, oftentimes you might not be missing much by sleeping on some of the new synths or plugins being dropped these days.
Which is why, despite the hundreds of plugins and synths we’ve reviewed, we very rarely give out Editor’s Choice Awards as we are incredibly choosy with who and what we bestow them on. Editor’s Choice Awards are really for the few-and-far-between products that really do bring something new to the table and change the game in a meaningful way. Arturia is no stranger to these awards, as their keyboards and interface have all landed Editor’s Choice Awards in previous years, but it’s an understatement to say that they, once again, came out swinging with this update in 2025.
I don’t want to bury the lead any more than I already have, so let’s get into why this *updated* plugin is so amazing and legit, game-changing.
What’s new?
Before I even get started, I’m getting all my information from this video right here. It’s great.
Aside from a bunch of new presets added to the library, the biggest addition to Pigments 6 is a new modal engine. It’s based on physical modeling synthesis; so, essentially, the sounds of physical objects (with a heavy emphasis on the transient that is made by that physical sound) and the response (i.e. reverb, echo, etc). The engine also includes exciters that initiate motion in a resonator and therefore create sound, with a collision exciter that emphasizes on short blasts and a friction exciter that focuses on sustained sounds. I’ve never quite seen anything like it, and I was really excited to try this out.
They’ve upgraded their filters, adding a drive control and adding an analog mode, as well as adding a cluster filter, which can add several peaks spread across the frequency range. They have also added a vocoder, allowing you to cross-modulate sounds from engines, filters, effects, and external audio inputs.
These are just some of the biggest changes in Pigments 6. Needless to say, it’s a lot. Now, let’s get into the review itself.
My Thoughts
I will come out and say that I am not a sound design master. I’ve gotten pretty good at melodic house sound design, but that’s about the extent of my knowledge. I’ve never really played with granular synthesis, or modal synthesis, or, really, half the things that come into play in Pigments. Thus, I was pretty much in over my head.
So, imagine my joy when I opened up Pigments for the first time and saw a step by step tutorial on how to use each and every knob, oscillator, and filter. This is the single best tutorial I have ever seen in a synthesizer. It loads sounds into each engine as it walks you through each part, and you’re able to play around and determine just what each and every part of it does. The plugin is a little bit intimidating at first, but with the tutorial’s help, you’re able to really get a handle on exactly what you can do with it very, very quickly.

Right from the start, it’s obvious that this is a plugin that anybody can use, regardless of skill level. While, yes, the main synth view looks fairly complicated (endless knobs, endless modulators, endless everything), the ease-of-use comes into play almost instantly. Hover over any one of those rectangular modulators and click on it, and you’ll be brought to a very sleek-looking lower bar that’ll show you exactly how your sound is moving.
Hover up to one of the names of those modulators (i.e. LFO 1) and you’ll see anything it’s currently controlling highlight in that very color. As you add more and more modulations to any sound you’re building, being able to see your progress that easily is extremely important.

Plus, if having that many knobs on your screen overwhelms you, there’s a far simpler mode to use called Play Mode. It’s a very pared-down version of Synth Mode, with many fewer things on the screen at once – all that’s there are the sound engines, a utility section (for noise and sub), filters, and FX, as well as some macros, a keyboard section to play notes, and an amplitude envelope.
This is probably not the mode to use if you’re in a sound design session. But, if you’re in the middle of creating a track and want to play with a few presets to see which would fit in your track, this is just about as perfect as it gets.

Two more modes exist – Effect Mode and Sequencer Mode. Effect Mode is pretty self explanatory – you can add delay, reverb, compression, vocoders, and more here. There are three effect slots for each sound, as well as an auxiliary effect slot holding three more. In total, you can have nine effects playing at once.
My favorite effect I’ve played with so far is the Shimmer – it’s just a really pretty, massive reverb, similar to the famed Valhalla product of the same name.

Sequencer Mode is a combined sequencer and arpeggiator. It allows you to create fascinating sequences of notes and gives you a lot of control. You could very easily make a six-note sequence of the same note playing at a slightly higher velocity each time, or you could make a an arp that has so much glide on each note that it the notes themselves sound completely unrecognizable.
The die on the left hand side completely randomizes everything you have – it’s probably my favorite part of this entire mode just because you never know what you’re gonna get, and it might be better than anything you could have dreamt up.

There are also over 1000 presets that come with the synth, ranging from granular, washed out pads to life-like pianos. The sounds are nicely split up into categories, so you can find what type of sound you’re looking for, play through, and then adjust it however you’d like. As I’ve shown already, the possibilities seem to quite possibly be endless with this plugin.
Also, if you click the little dotted circle next to the name of the preset, you’ll be given suggestions for other presets that are similar to that one. I have never seen anything like that, and it’s actually one of the coolest ways to cut down on preset browsing that I’ve ever seen.

There is so much more that I could go into about this plugin; from the in-depth granular synthesis engine and the sheer number of samples to play with, to the wide variety of filters, to the vocoder (which, honestly, could warrant its own piece), and more. But, I’ll hold my breath for now. Let’s get into the pros and cons of adding this synth to your collection.
The pros
It’s easy and fun to use.
I am a visual learner, so to see a synthesizer that relies so heavily on visuals is a breath of fresh air. I like seeing exactly how the sound is being affected as I affect it, and there is no shortage of that here. I mentioned Serum a bit earlier – this takes the visual aspects of Serum that I love and makes them even better.
Plus, using this plugin for this review is just about as fun of a time as I have ever had with sound design. Once again, I am not a major sound designer. I’ve always found it tedious. But, something about Pigments unlocked a childlike joy inside of me that I have never felt before; I kept going back and just playing little melodies, changing a few modulators and effects, and playing them again. I felt like a kid on Christmas.
I’ve genuinely never felt that way while sound designing.
It works automatically with their MIDI keyboard line.
A bit of a niche one here, but I’m a proud owner of a MiniLab 3. I’m happy to report that the knobs on the MiniLab directly correlate with essential functions in the synth, like the amplitude envelope, filter cutoff, and all four macros. I am sure that they’ve automatically mapped out even more functions to work with their larger keyboards. There is no additional mapping required unless I have a desire to do so; I can just twist a knob and it just works.
You get bang for your buck, and free updates.
Pigments usually retails for 200 USD, but I’m going to argue that the price is worth it for a few reasons.
- This could very well be the most powerful and user-friendly synth I have ever touched.
- Instead of buying a granular synth, a modal synth, an analog synth, and a wavetable synth, you could just buy Pigments, which has all of those functions built into it.
- If the past is an indicator of the future, then you’ll get Pigments 7 as a free update. And Pigments 8. All of the future updates will presumably be free, unless they change their protocol.
It’s also on sale for half off until February 18th, 2025. Just putting that out there.
The cons
It’s very CPU-heavy.
Get ready to freeze some tracks. It should come as no surprise that a synth as powerful as this one has the potential to brick your computer. One instance worked perfectly fine on my M2 Mac Mini, but I fear that those with less powerful machines may run into some serious CPU issues.
Arturia’s products are great, but they do pack a punch. Keep that in mind.
You may get overwhelmed.
Too much of a good thing may actually be a con. While there are endless sound design possibilities at hand with Pigments, it can get to the point of being a little bit overwhelming, as I alluded to earlier. The Play Mode is great and all, but the sound design capabilities in that mode are far limited to Synth Mode.
If you really want to get the most out of this synthesizer, I highly recommend staying in Synth Mode most of the time, and that mode may appear overwhelming at times to some – including me. Just take a deep breath and remember that the tutorials are always there to help you out.
Is Arturia Pigments 6 Worth It?
If you’ve got the cash and the RAM to handle it, absolutely.
The best part of making music, to me, is the joy that it brings. In my humble opinion, sound design, if done on the wrong synth, can suck the joy out of music production. This plugin only amplified that joy. For that reason alone, it’s worth a buy.
Grab Pigments here.
The post Arturia Pigments 6 Review: An INSANE & Easy-To-Use Sound Designing Machine (..But Is It Too Overwhelming?) appeared first on Magnetic Magazine.