


When it comes to making massive, club-friendly progressive house music, few in the underground do it better than Deviu. He’s been featured on top labels like Purified and more, and he recently made his debut on David Hohme’s Where the Heart Is Records with his remix of Amir Telem’s track “Get Up.”
Deviu is no stranger to the How It’s Made features—a few months ago, we asked him about the plugins and studio tools he used to create the aforementioned track, which was released on Purified.
Given how much magic he works in the studio, he was happy to return, run it back, and share the specific plugins he used on this latest release. So, as always, stream the song a few times below to acclimate your ears to the sauce he’s about to share before we dive into the latest iteration of How It Was Made: Amir Telem “Get Up” (Deviu Remix).
Diva

U-he Diva is a powerful virtual analog synthesizer that brings the warmth and character of classic hardware synths right to your computer. It models components from vintage synths, giving you the characteristic sound of analog without the needs of physical gear
I used Diva to craft an analog-style arp by blending two oscillators with a touch of noise for added texture. The main automation focuses on classic elements: a filter movement, and tune modulation with a fast LFO to create a subtle detune or vibrato effect. For additional processing, I applied basic techniques like EQ to clean up the sound, some compression, and sidechain to the kick. I also added a bit of harmonic saturation for warmth. For FX, I kept on Diva’s built-in reverb and delay to enhance the overall depth and atmosphere.
One thing I’ve learned is to experiment with Diva’s sections models like filters, oscillator types and more, switching between them can drastically change the character of your sound and give you a lot more creative control. Another tip is to automate modulation amounts and cutoff subtly over time to add dynamics and keep things interesting. Also, using Diva’s noise oscillator can really enhance your sounds, giving them a gritty edge and analog touch.
Trackspacer
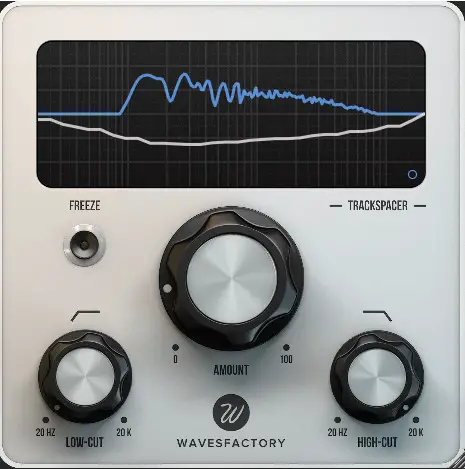
Wavesfactory Trackspacer is a plugin designed to create space in your mix by carving out frequencies in one track based on the audio signal from another. It works like sidechain compression, but instead of lowering the volume, it dynamically reduces only the specific frequencies that clash, making room for the more important elements.
I set it up to duck the pads and extra sounds when the lead arp comes in, which gave it a lot more clarity. I just play with the frequency range manually until it feels balanced.
It is a perfect tool for cleaning up busy mixes, like getting your vocals to sit nicely over instruments without fighting for space or giving a lead the right balance with the pads. It is intuitive and easy to use, offering precise control without a complex UI.
Pultec EQ
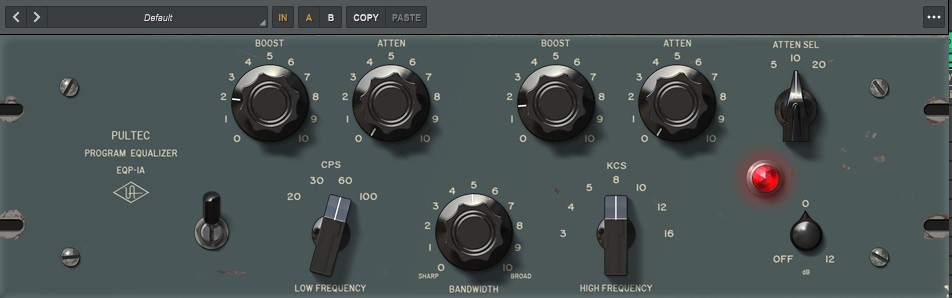
The Pultec EQ plugin from Universal Audio is a modeled version of the classic hardware EQ, known for its smooth tone. It recreates the signature “boost and cut” trick, where you can boost and attenuate the same frequencies simultaneously, adding warmth and clarity without harshness.
For this track, I used the Pultec EQ on the bass, lead and mix bus channel to give it that extra warmth and fullness. I played around with the low-end boost around 60 Hz and a little bit of boost on the high frequencies too at 10 kHz to add some subtle brightness to the overall mix.
If you’re working in a similar genre, the Pultec EQ is a game changer for shaping low-end and adding that analog warmth. Even small tweaks on this EQ can make a big difference in how elements sit together.
Ableton Stock Effects

Honestly, for this project, I didn’t rely too much on external or rare plugins. Never underestimate the power of Ableton Live’s built-in audio effects. They’re high-quality and super practical. Their clean UI makes them easy to use, and the ability to see everything happening in your chain at once is a huge time-saver. Sometimes, the simplest tools are the most effective, and Live’s stock effects definitely prove that.
I always use EQ Eight for quick, basic EQ tasks in my projects, like cleaning up the low end and removing resonances from each channel. The Glue Compressor is another go to, as the name suggests, it really helps to ‘glue’ sounds together, giving them more presence in the mix. I also love using the Auto Filter effect to automate the cutoff and create smoother transitions, which adds a nice dynamic flow to my tracks.
Quick Fire Tips For Making Progressive House
Tip #1:
Use atmospheric sounds like atmos pads and fx samples with reverb and delay to fill in the space and add texture. This helps create that immersive, cinematic feel.
Tip #2:
Layer your synths that combine analog warmth with digital clarity for a rich sound.
Layering basslines can give your track more depth. Use a sub-bass for the low-end power and a mid-bass for texture to make your bass stand out without overpowering the mix.
Tip #3:
Automate your filter cutoff to build tension and release in your breakdowns. It’s a simple trick but super effective in creating those big drops or transitions.
Tip #4
Use automations and transition fx to slowly introduce new elements in your track, keeping the progression smooth and engaging. This helps maintain energy and interest over longer, progressive builds.
Tip #5
Don’t be afraid to experiment with new presets and samples, use the mix between the “common sounds” and something new that can make your track stand out.
The post How It Was Made: Amir Telem – Get Up (Deviu Remix)(Where The Heart Is Records) appeared first on Magnetic Magazine.