


T & Sugah are closing out a huge year with a track that hits with purpose. “The Speaker” pushed their sound into new territory while holding onto the high-energy club presence that has turned their sets into reliable highlights across festivals and tours. Grace Barton’s vocal brings lift and presence, and the way it sits inside the arrangement gives the whole track a clear identity from the first line to the final drop.
This edition of the How It Was Made series walks through the exact tools behind that energy. The trio opened their project and explained the synths, plugins, and processing chains that shaped each section. Their approach is built on intention and repetition, leaning into clean design choices that support the vocal while keeping the drop as heavy as it needs to be.
If you have been following their recent releases on Monstercat, you can hear how their technique keeps developing with each project. The choices in this breakdown reflect the same mindset they bring to their live sets, focusing on sound quality, clarity, and weight. Everything here comes straight from the artists, word for word, so you can see precisely how “The Speaker” came together.
Serum 2
You probably heard of this one, but Serum 2 is our go to plugin. For those who don’t know it yet; it’s an incredibly intuitive and versatile synth that does most kinds of synthesis and sampling. If you want you could even use it as kind of a DAW and build a tune in one instance of Serum 2.
Going through this project we realized that Serum 2 is in fact the only VSTi we used. The main lead (see screenshot) is the most characteristic sound we made with it for this tune. As you can see, we combined some basic waveforms playing higher harmonics on top of a sub. We then run it through a resonant flange filter to accentuate the screechy harmonics even more. In the FX section we use a lot of clipping and distortion, this is what really creates the character of the sound.
If you want to make this type of sound filters like “flg” and “cmb” in Serum are fun to experiment with since they accentuate certain harmonics. Then in the FX section the “diode 1” distortion often gives it the right edge. If you want to use reverb, another great feature in Serum 2 is that you can sidechain the internal reverb with an envelope.
ENDLESS SMILE
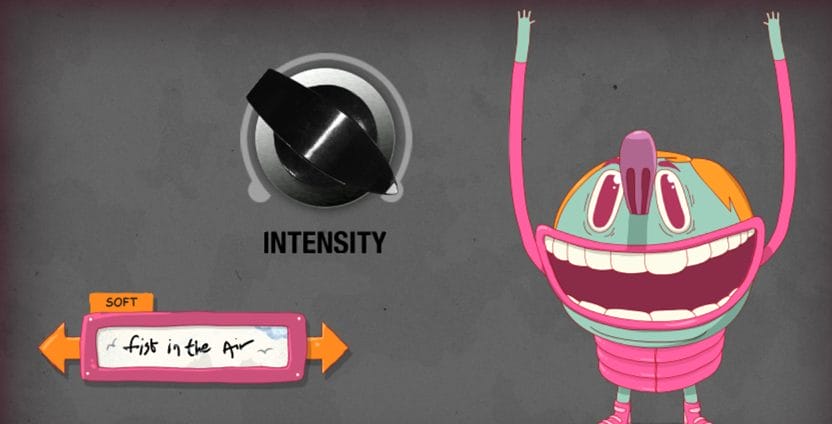
Another plugin we use in every project is Endless Smile by Dada Life. It’s an automatic buildup plugin with just one knob and 7 presets that range from a gentle filter + reverb build to very extreme ones with all sorts of pitch and phaser effects. In general, it’s great for making buildups that used to take a lot of time to make in a quick way.
We mostly use it for its amazing reverb though. In the first preset called “fists in the air” you can use the know to slightly high pass and reverb a certain element, which gives it a very clean washed out feeling. So, on some background and pad sounds we keep it halfway on permanently. Apart from that we use it to wash out the lead bass at the end of each for bars, to make it hit harder again when the new 4 bars part starts.
In any EDM genre you can just use this plugin as a one knob reverb, like we do. I think the main difference with other reverbs is that in Endless Smile the low end gets cut as you add more reverb, which prevents the reverb from making your mix muddy. My tip is to use it in a more static way on background sounds and in a more dynamic way, with lots of automation, on lead sounds.
StandardCLIP

This one gets used on almost every channel, it’s called StandardCLIP by SIR Audio Tools. It does exacly what the name suggests, it’s just a very simple clipping plugin that does exactly what it should do without any bells and whistles. I really like the simple yet effective visual feedback that the plugin provides so you know how hard you’re hitting the ceiling.
For The Speaker the most apparent use is on the lead synth. When you make these kinds of rough synth sounds, clipping them really brings out the power. The lead synth in The Speaker we clipped so hard that you couldn’t even see it on the visualizer anymore (I think it’s around 12 dB of clipping). On top of that we used the softflipping setting at 80%, this brings up the quiet parts of a sound even more.
When you use StandardCLIP, or any other distortion plugin, it’s important to keep the sound clean. Between every stage of clipping and distorting we have an EQ or Soothe2 to clean up some of the muddiness and to make sure that the right frequencies are hitting the distortion. In general it can for example be nice to cut some low mids and turn up the mids before clipping, it’s something you have to experiment with though.
Soothe2
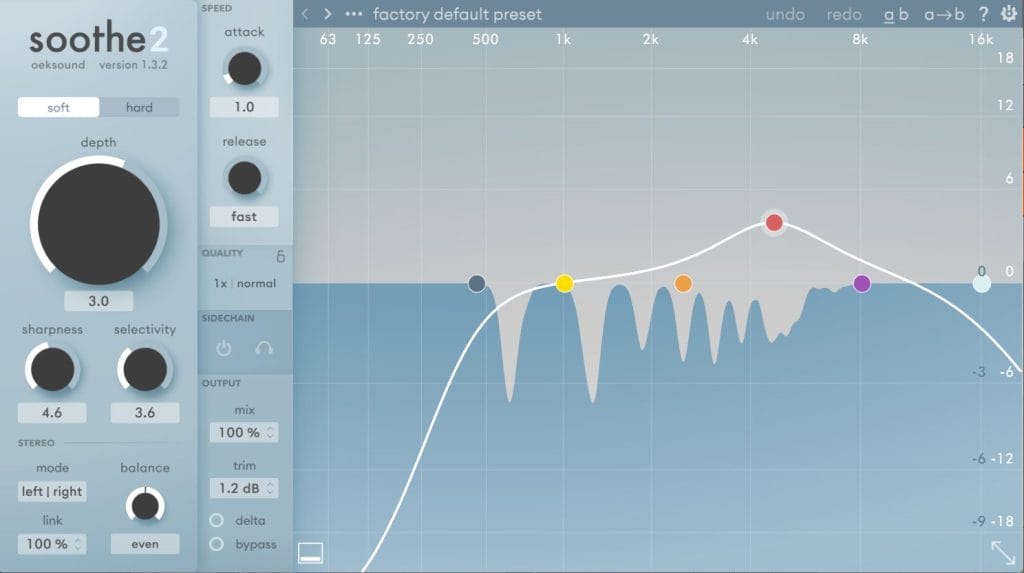
This brings us to the final plugin we want to talk about which is Soothe2 by Oeksound. It’s a plugin that’s used to clean up your sounds, or even multiple sounds when you use it on a bus. Soothe2 basically automatically finds nasty resonances and turns them down. You can adjust the range of frequencies it affects as well with the EQ.
We used it a lot for The Speaker as well, and again its most important use was on the lead synth. We did multiple stages of clipping, EQing and distorting, but after that the sound ended up a little harsh. We just put soothe2 on there with it’s default setting and turned up the depth a bit to taste. It made a huge difference to the sound of the lead, which would have been very exhausting to listen to otherwise.
From our experience there are two main uses for Soothe. One of them is just for general clean up, like we did with our lead synth. The other one is to clean up specific areas. In a vocal for example you can sometimes find annoying peaks and resonances in the low mids. You can then isolate that specific range with the EQ in Soothe2 and let it work its magic in that area. A bonus use case it to use it as a sidechain plugin, by for example using the vocal as sidechain input, making it dip for example the instrumental at the exact frequencies where the vocal is hitting.
Quick Tips On Making Music

Tip #1: Clip and Dip; Do multiple rounds of distorting/clipping a sound and cleaning them up with an EQ, until it sounds fat.
Tip #2: Don’t be afraid to use samples and presets; a lot of big producers do. Creating a sick tune should be priority 1, making everything from scratch is fun, but not the most important part of making music.
Tip #3: Less is More. The cliche holds up haha. As we progressed, we noticed that our tunes have fewer and fewer elements. It’s better to have one good lead, then to layer 5 mediocre leads.
Tip #4 : Take breaks and change playback environment. Leaving a tune for a day and coming back or playing it in the car, in the club, in the living room can give you a lot of info. Not even because of the different sound system, but to see if it conveys the feeling you want it to convey in those settings.
Tip #5: Work with others. First of all, it’s inspiring and gives you input you wouldn’t get normally. Secondly, it’s a great way to learn new production techniques.

The post How It Was Made: T & Sugah, Grace Barton – “The Speaker” appeared first on Magnetic Magazine.