


Ghent-based producer Primate has quickly carved out a reputation as one of the most exciting new names in drum & bass. Known for heavy-hitting sets packed with screeching basslines and raw jump-up energy, he’s steadily expanded his sound into more melodic and technical territory. With roots in a family of writers, actors, and jazz musicians, his music reflects both raw energy and a strong sense of musicality.
Since his first DnB show in 2018, Primate has grown into an indispensable headliner across Europe, channeling influences from the underground into a style that’s unmistakably his own. His new single, “About Us,” dropping September 5 as a self-release, captures that evolution with a mix of sharp sound design, heavy low-end pressure, and emotional depth.
In this How It Was Made feature, Primate breaks down the plugins, techniques, and creative choices that went into building About Us. From his reliance on Xfer Serum to creative use of plugins like Kilohearts Resonator, FabFilter Pro-Q3, and ST4b, he shares a detailed look at how the track came together—and the lessons he’s picked up along the way for other producers pushing into dubstep and drum & bass.
Serum
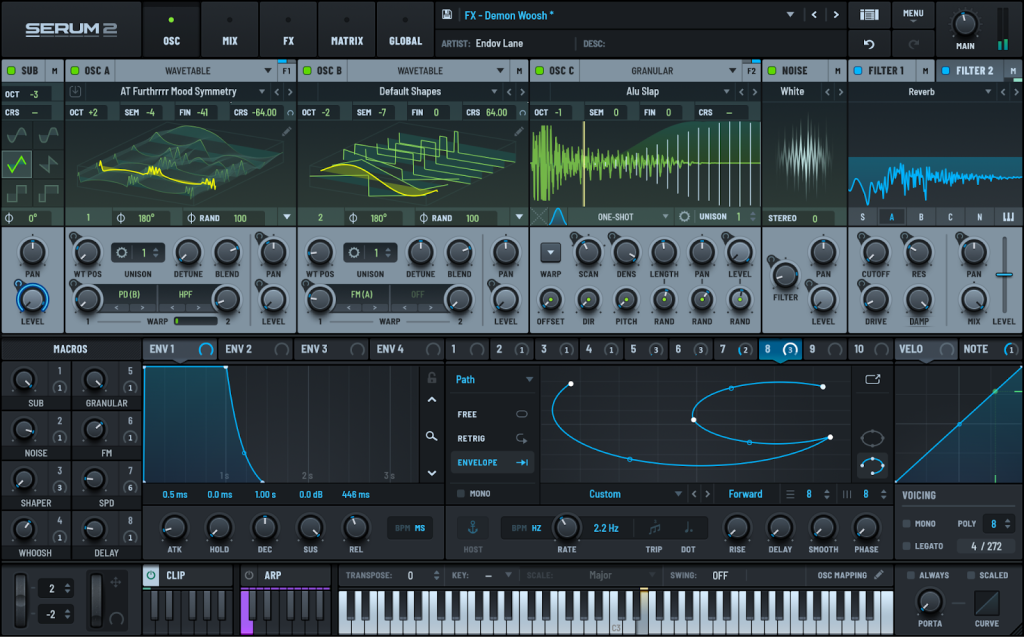
I leaned heavily on Xfer Serum for this track, which is pretty much a go-to for modern bass music. It’s a wavetable synth that gives you an insane amount of control over shaping sounds, easy to pick up but hard to master. What makes it stand out for me is how visual and intuitive it is — you can literally see the modulation and waveforms moving as you tweak them. This makes sound design feel less like guesswork and more like sculpting the sound in real time.
I approached this track the same way I do with most of my productions — starting from Serum’s initial preset to sketch some simple chords and set the vibe. On top of that, I layered a whistly, square-style lead and then copied the low notes into a third Serum layer, usually a Reese or distorted saw, to give the idea some immediate weight. Those three layers — saw stack, square lead, and bass — act as the foundation, even if I later turn them down in the mix. From there, I build excitement by layering Serum presets I’ve already made or heavily tweaked, then bounce, chop, and process the stack with distortion, reverb, and a key plugin I’ll dive into later in the article, since it played a big role in making the drop melody stand out.
One of the best things about Serum is that you can keep it simple and still get great results — even the basic wavetables can sound huge if you pitch them down and add some distortion. The pitch modulation in the bottom left is super powerful for creating movement, whether you’re grouping multiple instances together or adding subtle details. I also love using envelopes for sharp stabs, like modulating oscillator pitch to give a sound a little percussive “kick,” or automating the noise oscillator to make things feel more natural. Small touches like these can really accentuate your sound and bring your ideas to life.
Kilohearts Resonator
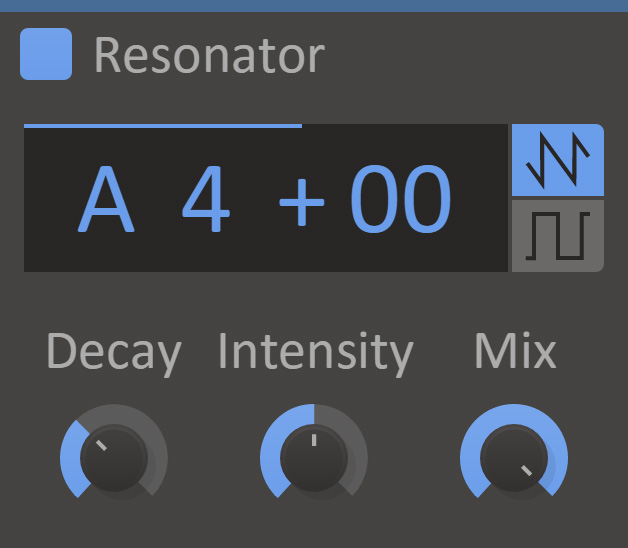
For this track, one of the main effects I used was the Kilohearts Resonator.
Kilohearts Resonator is an effect that works by stacking short delays of the incoming signal on top of each other, creating a pitched, resonating tone. You can lock it to a specific frequency or musical note, which basically lets you add controlled harmonics to any sound. The plugin also gives you control over how long the resonance rings out, whether it oscillates as a sine or square wave, and how much distortion or mix you want blended in. It’s a super flexible way to turn almost any source into something tonal, textured, and musical.
In this track, I ran the chopped-up chord stacks I mentioned earlier through three different instances of Kilohearts Resonator, which ended up shaping the main riff in the drop. In the first part of the riff, two resonators are layered and automated to different notes, so the pitch shifts between the first and second half of the bar, adding variation and harmonic movement. When the full drums kick in, I added a third resonator tuned to a single frequency, which really glues together with the sub and gives the drop its crunchy, overtone-rich character. You can still hear the original chord stacks buried underneath, but with the resonators and additional distortion, they come through with a boosted, textured presence that makes the melody pop.
One of my favorite tricks with Resonator is using it on sounds that feel cool but aren’t quite full enough yet. If you boost the sub and really drive the resonator, it locks in with the low end and creates a crunchy, unique texture that instantly feels bigger. Playing with a long decay and switching between sine and square modes while pitching the resonance high up can unlock some wild tones. Once you’ve got something interesting, bounce it down and resample, that’s where you can push it even further.
FabFilter Pro-Q3
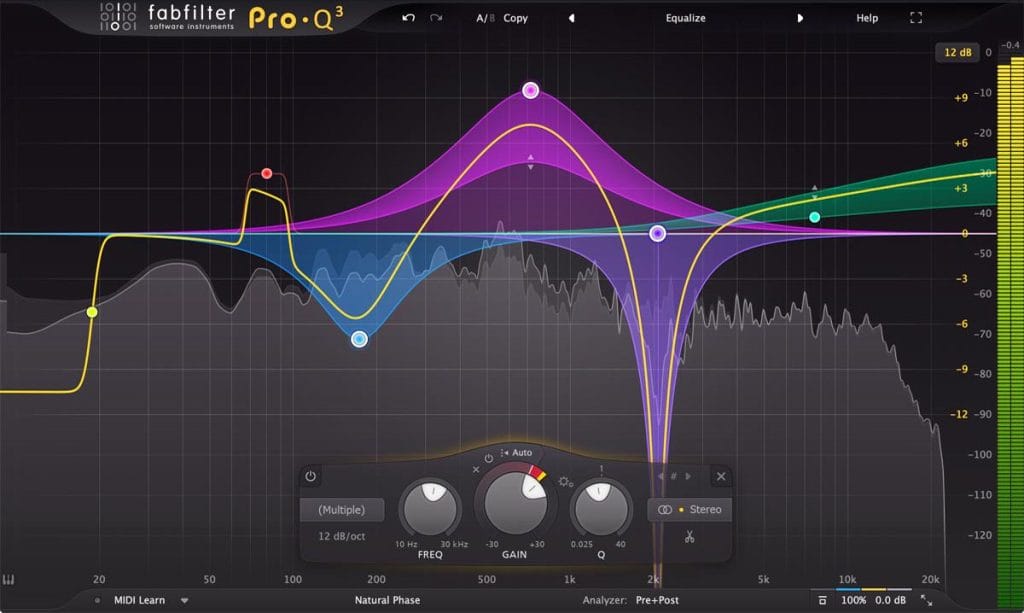
The second plugin i’m going for is probably the most used plugin in all of my projects. FabFilter Pro-Q3. It’s my go-to EQ because it’s both extremely precise and versatile. It gives you up to 24 fully parametric bands, each with adjustable shapes, slopes, and even dynamic control, so you can target specific frequencies only when they get too loud. The real strength is how visual it is — you can literally see resonances in the spectrum and carve them out in real time. It also has options like linear phase and natural phase modes aswell as mid / side mode for stereo design. this makes it equally reliable for both surgical mixing moves and transparent mastering adjustments.
Pretty much every element in my tracks ends up with a Pro-Q3 on it somewhere, and I often use it more for boosting and frequency masking than just cutting things out. In this tune, it played a big role in the drop, especially for enhancing the harmonics I created with the Resonator earlier — boosting those key frequencies really made them stand out. I also leaned on it to push the low end in certain sections so the drop felt crunchier and heavier. On top of that, I use Pro-Q3 constantly as a sweeping filter, automating high-pass and low-pass moves to create transitions and give each new section of the arrangement more impact. And in the final mix, when the track felt too bright, I used the dynamic mode to dip highs in the drums, synths, and vocals only when they became harsh, keeping the energy without letting the mix get fatiguing.
One of my favorite features in Pro-Q3 is the piano scale mode, which maps frequencies directly to musical notes. I often use it on drums, FX, or noise sweeps to boost certain frequencies so they sit in the right key, even if the original sound isn’t tonal to begin with. At the same time, people shouldn’t be afraid to really push Pro-Q3 — you can boost by up to 24dB and create unique overtones, which is even how hardstyle kicks are built by stacking EQ boosts. Combining those bold moves with more subtle key-based shaping can make your sounds both musical and aggressive in a really creative way.
ST4b
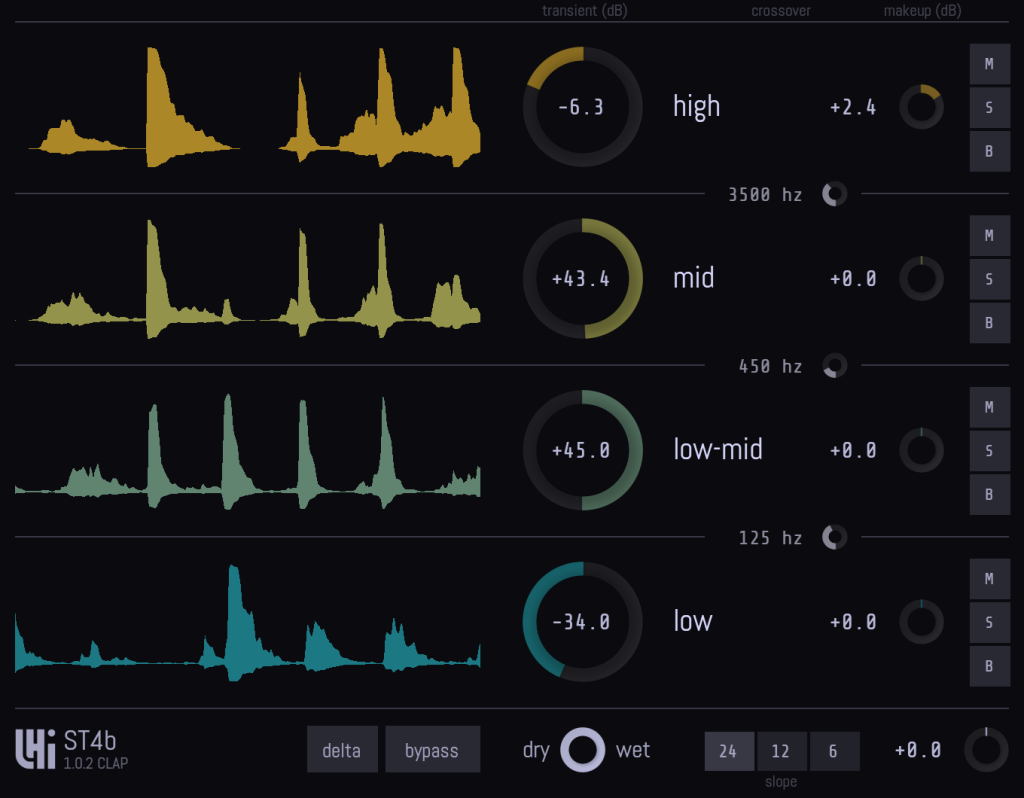
ST4b is a multiband transient processor that lets you shape the attack and sustain of different frequency ranges independently. Unlike a standard transient shaper, it splits the signal into bands, so you can, for example, boost the attack in the mids while tightening the lows or extending the highs. This makes it especially powerful on drums and bass, where you need precise control over how each part of the spectrum punches and decays. It’s a surgical but creative way to make sounds hit harder without overprocessing the whole mix.
I used ST4b heavily in this track to give my chopped chord stacks the kind of punch they don’t naturally have. Since those plucks come from cutting up chords, they don’t carry much attack on their own, so ST4b let me really shape the transient and turn them into proper stabs. Most of the time I’ll push the low mids, mids, and especially the high mids, which makes the sound cut through as sharp and punchy rather than just a soft pluck. I’ll often follow it with a waveshaper or distortion, which enhances the effect even more. When I place ST4b after the resonator, it accentuates those harmonics and almost transforms the sound into a bell-like stab that sits perfectly in the drop.
A cool trick with ST4b is that you don’t have to use it strictly for adding attack or cutting sustain — it can also work like a unique EQ. For example, putting it on a bass stab and boosting the low or low-mid band doesn’t just warm the sound, it also adds a bit of transient bite that a normal EQ wouldn’t give you. You can even go crazy with it — boosting the mids or low-mids by 12dB in ST4b reshapes the sound into something much more aggressive. After that, just pull the overall volume back down so it’s not distorting, and you’re left with a thicker, more unique tone than you’d ever get from a regular EQ.
Quick Fire Tips For Making DnB
Tip #1: Start with the essentials: loud kick, loud snare, loud hat, and a heavy sub. Push them until they almost distort, then pull back slightly, once those hit hard, you can layer and mix anything on top and it’ll still work.
Tip #2: Don’t be afraid to reuse parts of your track in the buildup, export a melody or chord, throw some reverb on it, and layer it for cohesion. Stack as many elements as you want, risers, fills, snares, then tame it all with volume and filter automation so the buildup feels huge without overpowering the drop.
Tip #3: A common mistake I made for the longest time was low-cutting everything, pads, hats, atmospheres, thinking the bass needed all the space. In reality, leaving some low end and low mids in those layers adds warmth and makes the track feel like real music. Cutting too much makes everything sound disconnected!
Tip #4: You don’t need endless presets to make a sound big, just resample what you already have. Take a bass stab or a pattern. export it, pitch one up and one down, then EQ, distort, widen each layer separately; stacked together, they create a huge, harmonic-rich sound from a single source.
Tip #5: Drum & Bass is one of the hardest genres to produce, but also one of the most creative, because you can push everything loud and it still works. When you’re starting out, focus on just making your sounds hit as loud as possible; trust me, in a set people will not think twice about what snare or what presets you use! Once you get the feeling of what hits hard then you can start finetuning and really create your distinct sound.
The post How It Was Made: Primate – About Us (Self Release + Dubstep / DnB) appeared first on Magnetic Magazine.