


Morkhal has continued to refine a focused production approach built around tension, rhythm, and long-form development. His new EP Aether Construct, released via his own 3MOON Records on January 30, 2026, captures that direction across four tracks designed for extended club environments. The project reflects a clear studio mindset where movement and pressure are shaped gradually rather than through constant variation, with each track functioning as part of a single system.
For this How It Was Made feature, Morkhal broke down the core tools that defined the EP’s internal motion and structure. Instead of outlining a full session walkthrough, he selected the plugins that carried the most responsibility across the record, explaining how each one was applied, controlled, and restrained to maintain cohesion. The focus stays on function and placement, showing how modulation, texture, and bus processing were used to support repetition without flattening energy.
The How It Was Made feature below is presented directly from the artist and organized by tool. For producers working in dark or hypnotic techno, this breakdown offers a clear reference for building controlled evolution inside a track while keeping systems efficient and intentional.
RANDOM by Beatsurfing
RANDOM is a modulation-focused plugin designed to introduce controlled unpredictability into your sounds. Rather than generating audio itself, it works by modulating parameters in real time using randomised values that can be synced, smoothed, or locked to specific ranges. This makes it incredibly useful for adding movement, variation, and life to otherwise static elements. It’s simple on the surface but extremely powerful once you start routing it creatively.
In this track, I used RANDOM to subtly modulate parameters on synth layers and effects rather than driving anything too aggressively. I mapped it to filter cutoff and wavetable position, keeping the depth low so the movement stayed organic and hypnotic. Slow rate settings were key, allowing the sound to evolve over time without breaking the groove. In some sections, I automated the modulation amount to increase tension during transitions, then pulled it back once the drop hit, keeping everything feeling alive but controlled.
For dark or hypnotic techno, RANDOM is best used with restraint — tiny changes over long periods have far more impact than obvious modulation. One trick I’ve learned is to map it to just one or two parameters and let it run in the background, almost unnoticed. It’s especially effective on pads, textures, and effects returns where movement adds depth without stealing focus. Think of RANDOM as a way to humanise machines and keep repetition feeling intentional rather than static.
Ableton Wavetable

Wavetable is Ableton Live’s stock wavetable synthesiser, designed for modern sound design with a clean, intuitive layout. It allows you to morph smoothly between different waveforms, making it ideal for evolving basses, pads, and textured leads. The synth includes two main oscillators, a flexible modulation matrix, and built-in filters and effects that are well suited to electronic music. Despite being a stock plugin, it’s extremely powerful and capable of very deep sound shaping.
In the track, I used Wavetable to create an evolving mid-layer that sits between the bass and the atmosphere. I started from a basic wavetable preset and manually adjusted the wavetable position, automating it slowly over time to create movement without distraction. Subtle filter automation helped control energy across different sections, while light saturation and Ableton’s stock reverb were used to add warmth and space. I kept the sound intentionally restrained so it enhanced the groove rather than dominating it.
For producers working in darker or hypnotic techno, Wavetable really shines when you focus on slow modulation rather than dramatic changes. Automating wavetable position or filter cutoff very subtly over long periods can add tension and evolution without breaking the flow. Don’t overlook the stock filters — they’re clean but characterful when pushed slightly. Most importantly, treat Wavetable as a tool for texture and movement, not just melody; it’s perfect for sounds that sit deep in the mix and support the overall energy.
Ableton Grain Delay
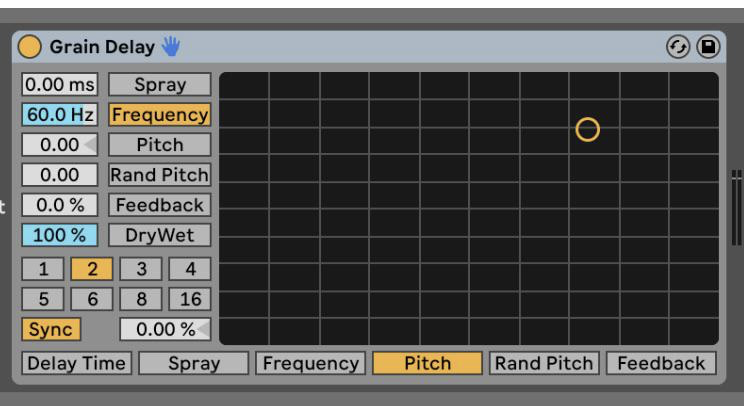
Grain Delay is one of Ableton Live’s stock creative effects that blurs the line between delay, texture, and sound design. Instead of repeating the signal traditionally, it chops audio into tiny grains and replays them with adjustable pitch, frequency spread, and randomness. This makes it ideal for adding movement, instability, and character rather than clean echoes. It’s a deceptively simple plugin that can turn static sounds into something alive and unpredictable.
In all the track sin my latest EP ‘Aether Contruct’, I used Grain Delay primarily on the bassline to introduce subtle movement and grit. I kept the delay time short, dialled in a controlled amount of spray, and slightly pitched the grains to add harmonic texture without overpowering the low end. Automation was key — I slowly opened the dry/wet during transitions to increase tension, then pulled it back for impact. After Grain Delay, I used light saturation and EQ to keep the result tight and focused in the mix.
For raw or hypnotic techno, Grain Delay works best when used sparingly and with intention. Short delay times and low dry/wet settings can add character without turning the sound chaotic. Automating just one parameter, like spray or frequency, over long sections can create evolving textures that stay subtle but effective. I’ve learned to treat Grain Delay less like a delay and more like a texture generator — it’s perfect for giving basslines and percussive elements a unique, signature edge.
UAD SSL G Bus Compressor
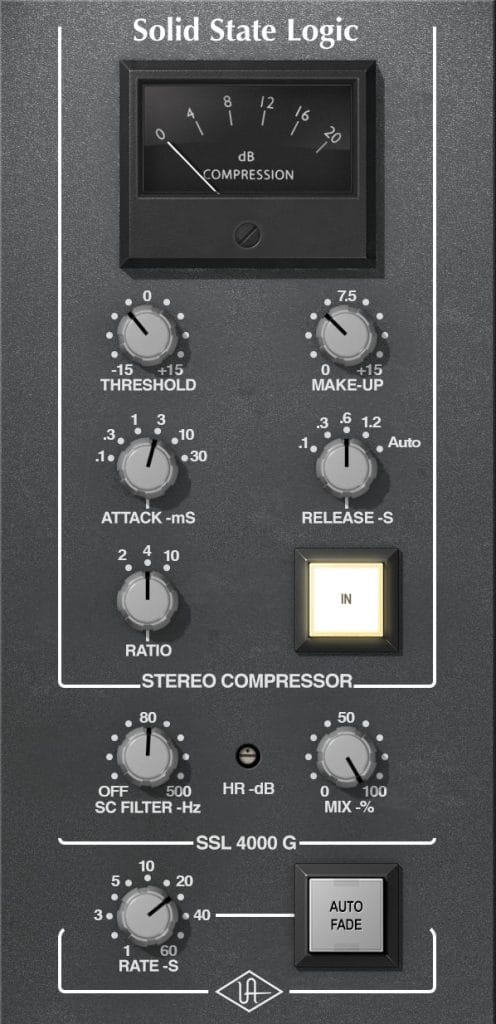
The UAD SSL G Bus Compressor is a classic mix-bus compressor modelled on the legendary SSL console bus compression. It’s designed to gently glue elements together, tightening transients while preserving the natural punch of a mix. With simple controls for threshold, ratio, attack, and release, it encourages subtle, musical compression rather than heavy-handed processing. It’s a go-to tool for adding cohesion and polish, especially in electronic music where groove and energy are key.
I used the UAD SSL G Bus Compressor on the main drum bus to help everything lock together and feel more unified. The settings were kept subtle — a low ratio, slow attack, and auto release — just enough to catch peaks and enhance the groove without flattening it. I aimed for no more than 2–3 dB of gain reduction, letting the transients still breathe. It sat after a gentle EQ and before final saturation, acting as the glue that made the drums feel like a single, cohesive unit rather than separate elements.
For techno and other groove-driven genres, the SSL G Bus really shines when you resist the urge to over-compress. Using a slower attack helps preserve punch while still giving you that classic glue effect. I’ve learned that inserting it early in a bus chain and mixing into it can lead to more balanced decisions overall. Think of it less as a corrective tool and more as a way to enhance movement and energy across the track.
Granulator III
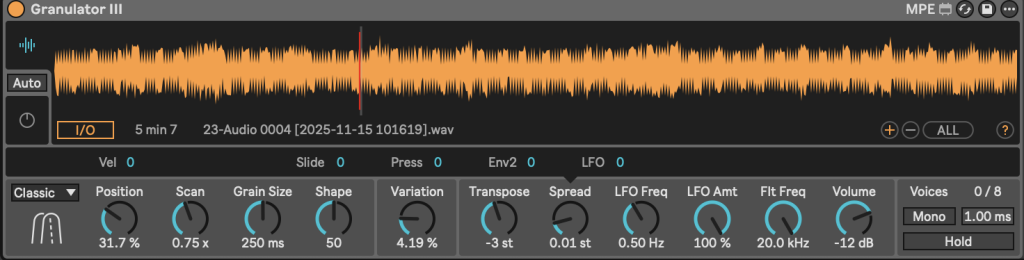
Granulator III is Ableton’s advanced granular audio device, designed for deep texture creation and experimental sound manipulation. It works by breaking audio samples into tiny grains and reshaping them in real time using controls like grain size, spray, pitch, and envelope shaping. Unlike traditional effects, Granulator III behaves more like an instrument, allowing extreme control over movement and density. It’s perfect for creating evolving atmospheres, pads, and abstract effects that feel organic and unpredictable.
In many of my tracks I use Granulator III as my go-to tool for creating evolving background textures and tension layers. I loaded in short tonal samples and experimented with grain size and spray to find a balance between recognisable tone and abstraction. Slow automation on grain position and pitch added constant movement, while a low-pass filter helped keep the sound warm and controlled. I then processed it further with Ableton’s stock reverb and subtle saturation to help it sit deeper in the mix without overpowering the main elements.
For dark or hypnotic techno, Granulator III really comes alive when you avoid overloading it with modulation. Small changes over long periods create far more impact than extreme settings. One trick I rely on is using very short samples and stretching them into long, evolving layers that build tension subtly. Treat it as a tool for atmosphere and energy rather than a lead sound — it’s ideal for filling space while keeping the groove hypnotic and immersive.
Infiltrator by Devious Machines
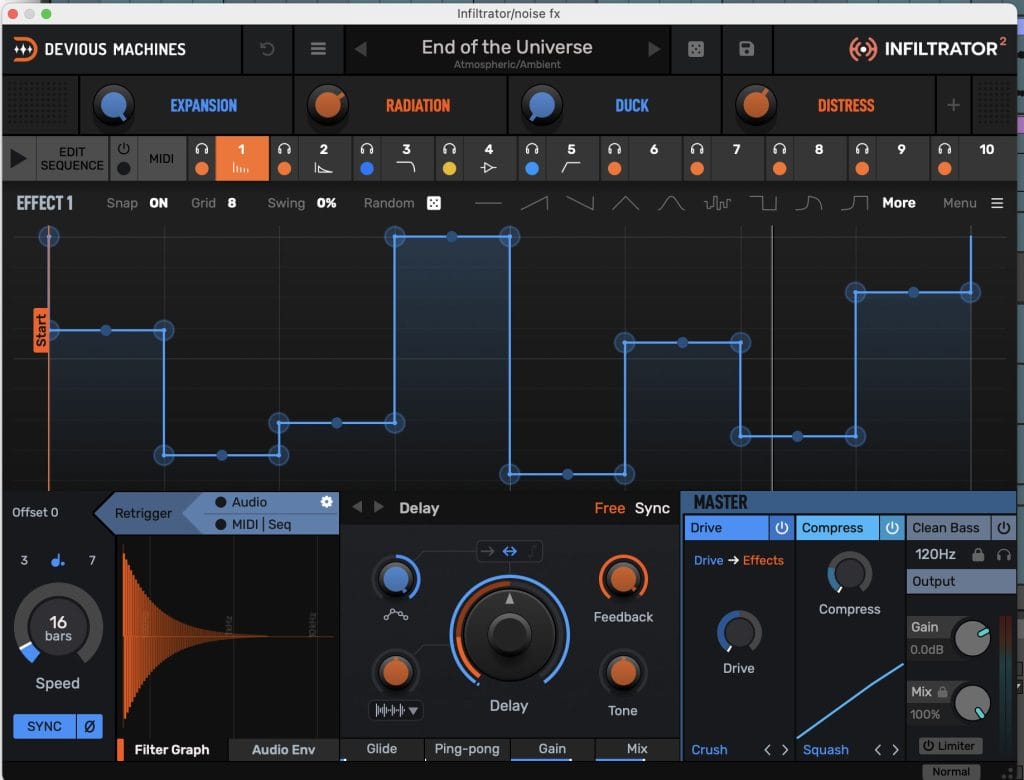
Infiltrator is a multi-effect processor built around rhythmic modulation and sequencing, making it a powerful creative tool rather than a traditional mixing plugin. It combines filters, distortion, delay, reverb, pitch, and modulation effects, all driven by step-based envelopes and patterns. The strength of Infiltrator lies in how quickly it can inject movement, groove, and complexity into otherwise static sounds. Despite its depth, it remains very playable and encourages experimentation.
I used Infiltrator mainly as a movement generator on mid-range elements and textures. Starting from one of the rhythm-focused presets, I customised the effect slots to focus on filtering, saturation, and subtle pitch movement rather than extreme processing. I automated the macro controls to bring the effect in during transitions and breakdowns, then pulled it back during the main groove to keep the track grounded. After Infiltrator, I applied light EQ and compression to control dynamics and make sure the energy stayed tight in the mix.
For dark, hypnotic techno, Infiltrator works best when you avoid full-on chaos and focus on groove. Use fewer effects at once and let the sequencer do the work — small rhythmic modulations can completely transform a sound. One trick I rely on is automating the mix or macro knobs rather than individual parameters for smooth transitions. Treat Infiltrator as a performance tool, not just an insert, and it becomes incredibly powerful for building tension and controlled movement.
Tips For Making Music

Tip #1
Start with energy, not sounds — decide what the track should feel like before you write a single note. If the idea is strong, every bass hit, drum choice, and texture will naturally fall into place.
Tip #2
Less elements, more intention — hypnotic techno lives in repetition and subtle change. Automate slowly, commit to restraint, and let tension do the heavy lifting rather than over-arranging.
The post How It Was Made: Morkhal – Aether Construct EP appeared first on Magnetic Magazine.