


Truthlive has built a reputation for blending deep house frameworks with electronic soul, R&B, and hip-hop sensibilities, leaning heavily on groove and musicality. Much of his work sits in a lineage that values feel, swing, and texture, drawing as much from beat culture as it does from club systems. His latest single “Surrender,” featuring Erica Ambrin, lands on Mise En Place, a label known for its careful curation and ear for understated, soulful electronic music.
For this How It Was Made, Truthlive breaks down the production of “Surrender,” a low-slung, soul-rooted cut built around feel rather than excess. Working entirely in Ableton with a tight, repeatable toolkit, the focus stays on groove, timing, and restraint, from Serum-led chords to subtly humanised vocals and bass. It’s a clear look at how small decisions around swing, space, and sound choice add up to something warm, loose, and quietly effective.
Xfer Serum
I used Serum for all of the synths on this track. I generally only use Serum. This session is with the OG version, not Serum 2 (granted I love Serum 2). That’s just because I hadn’t added Serum 2 yet when I did this (was hella late to the party). I am a big believer it’s not what you use, but how you use it. Serum does pretty much everything synth/patch/sound design related I need it to. It’s a one stop shop for all things (not drum or sample based). I don’t want to poke around endlessly on all of the available synth plugins and the infinite possibilities. I want to create. If I get bored with Serum, I’ll try something else (which rarely happens as it’s so flexible).
That said, I most often use a stock piano to create my original chord progression or primary composition parts. Once happy with the basic concept(s), I then drag the midi info played on piano on a separate track, to the tracks with Serum on it. This is a fast workflow process. Get the main chords dialed in, first–then copy/paste/edit. So much of the other musical parts can be made using some, or all of the OG midi info. None of the notes I am going to use exist outside of that initial overall palette. I can be as creative or simplistic as what sounds good.
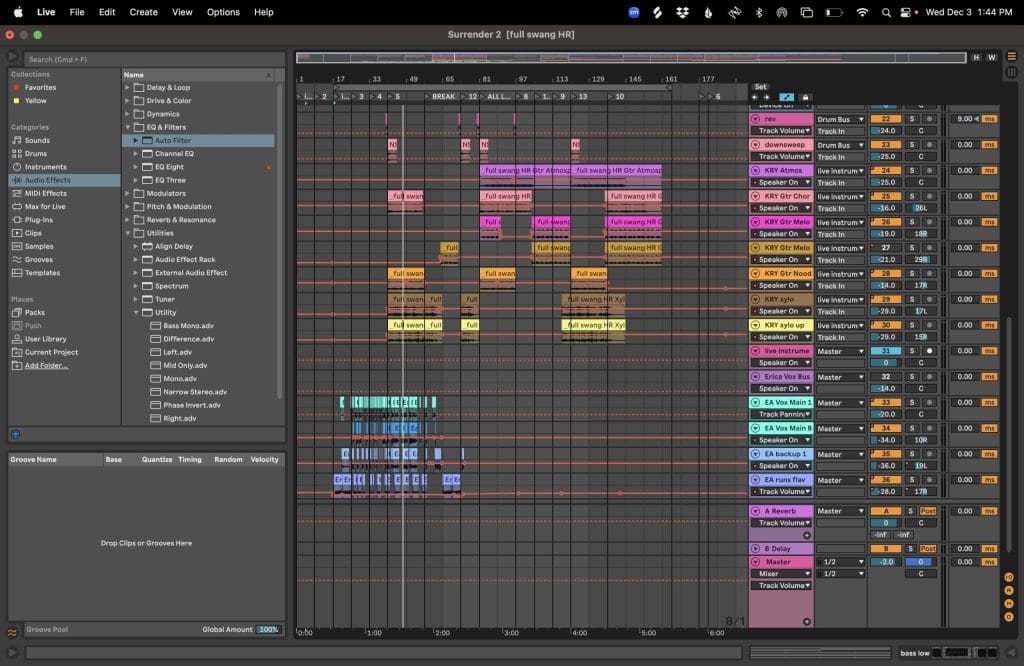
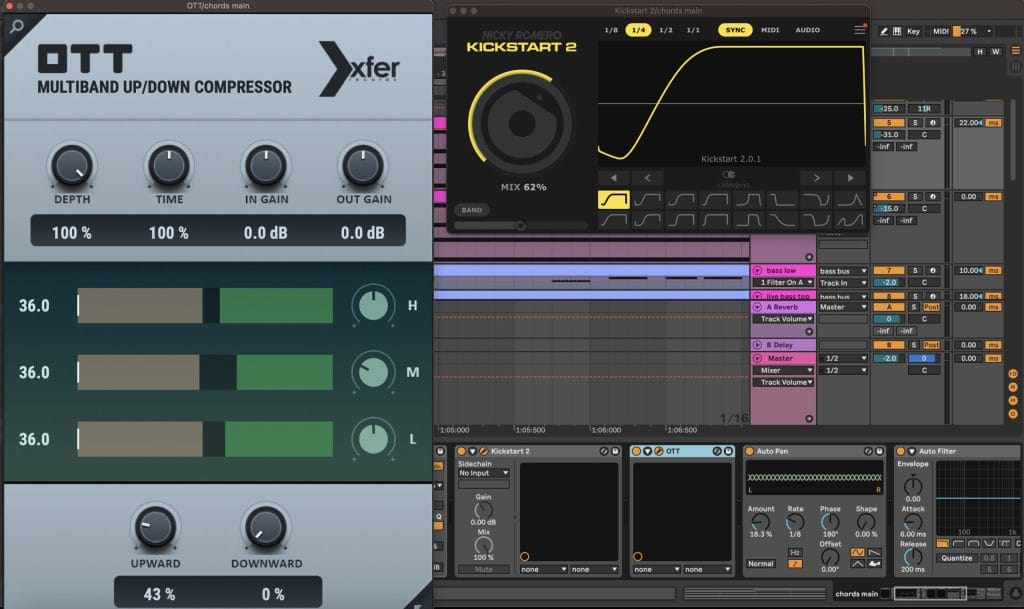
I use the following default (custom template) chain on all of my Serum tracks to start (add or takeaway as needed): Xfer Serum -> Ableton EQ Eight -> Nicky Romero Kickstart 2 -> Xfer OTT -> Ableton Auto Pan (* legacy version from 11 or prior) -> Ableton Auto Filter -> Bass Kleph’s Easy Wash Out -> Ableton Wide Stereo. I find those tools can almost always achieve the full sound design I am looking for (for this track I used Serum’s internal EFX for reverb, delay, etc.). They are all I used on this track on both primary synth components. * Oddly, I didn’t use any bus tracks for this. Normally I will do more precise tweaking of EQ, compression, reverb, soothing, etc, it just didn’t happen on this song. Sounded fine as is.
Specifically, I cut and enhanced the respective EQ’s to reduce frequency competition with the whole complete beat (all elements considered), a ¼ sidechain used at approx 60% wet (not assigned to an input), a 1/16 panning (* enable notes button) with the phase at 180 degrees at 18% wet, turned the downward setting on the OTT to 0%, upward to 43%, and turned the Mid EQ down a bit to smooth out some harshness it brought out, and then used filter and wash at various parts in the overall sequencing to make it less repetitive and boring for the overall flow and transitions between stanzas.
The non-bass synths used are a key (chords main) and a pad (chords pad). That’s it. Often I will stack sounds to create a more original and fuller sound design feeling, but this track didn’t need it. The chosen sounds were already dynamic as is (minor internal setting changes). The keys and pads are the exact same midi info, yet they feel like more. This is because of the actual quality control on the patches I chose, and also a small but meaningful tweak on their respective timing. For the key (chords main) I manually dragged the whole section of midi info (4 bar chord progression) late ⅛ bar. This makes the pad start on the 1 for ambient fill, and the keys sound more natural coming in a little later. I also went in and made some very minor but useful velocity changes to some of the notes to enhance the natural feel. This subtle touch helps humanize things in a way more pleasing to the ear.
The exact sound patches used are both downloaded from Splice. They are GoGoi Audio’s stutybeat key daytona (key — chords main) and Formal One’s Pad Magnetic Tape (pad – chords pad).
One helpful tip is to use the key settings in Ableton’s Clip View in the bottom left of the screen. Enable the scale button (turns from gray to yellow if turned on). Then set the Scale to whatever key you’re playing in. In the Clip Display section adjacent to the right (where the midi info populates) you can toggle the Fold and Scale buttons to help develop more nuanced alterations and better clarity on what you can or can’t do musically. Fold will only show notes you’ve played on that track. Scale will show you the full scale still musically in key.
Nicky Romero Kickstart 2
If you don’t have this, get it now. It is the most easy and simple way to sidechain. You don’t necessarily need to assign the input to another track (as standard with most sidechaining techniques) to get the ducking where you want it. It’s dummy proof. The default setting when immediately turned on is dope, as is. Alter the wet/dry or change timing as you see fit.
I used this on the keys, pads, bass, ambient vocal texture samples, and the actual master track too (very subtly to overemphasize the pump for that slumpy groove feeling).
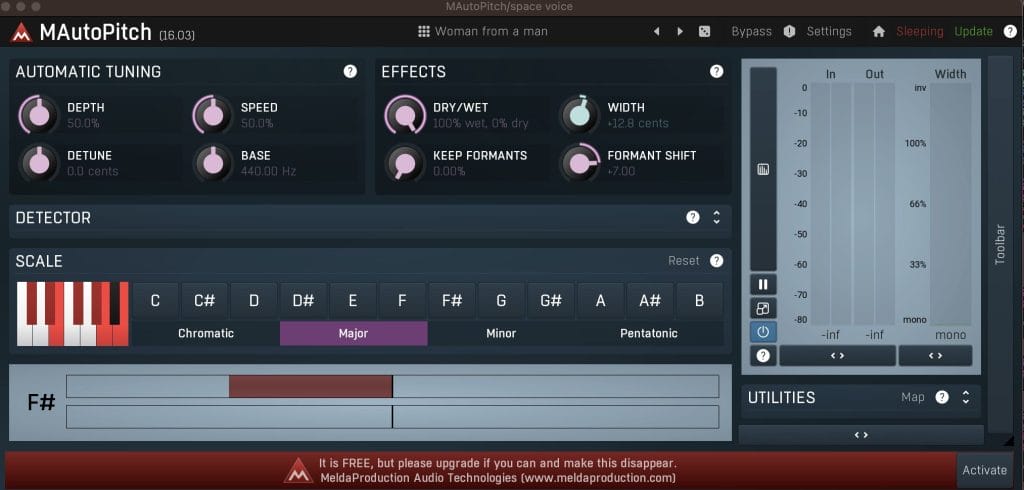
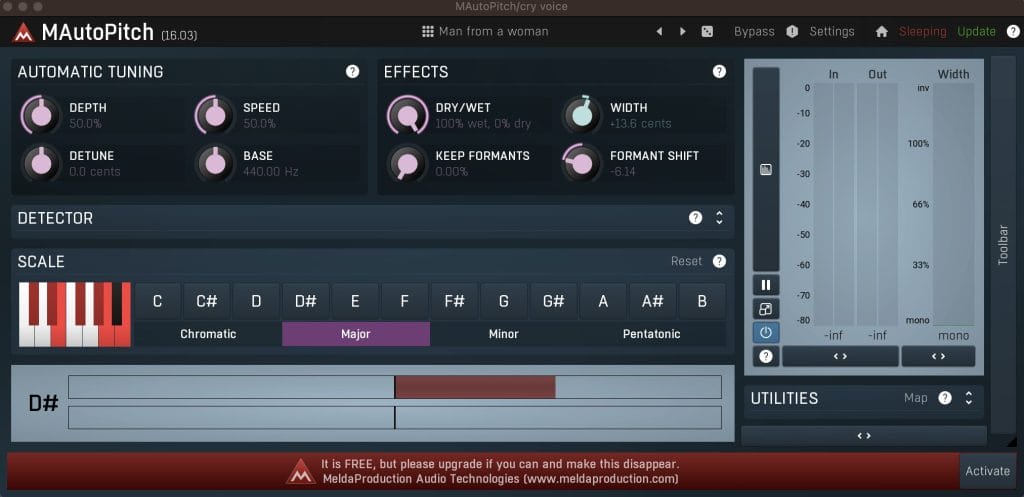
Melda Production M Auto Pitch
This is a slept on plug in. It is a simple pitch correction tool and it’s free.
One slightly wonky thing is you can’t obviously tell which key you are set to. In the Scale section, you need to choose minor or major FIRST, and then select the key, or it doesn’t do anything. I don’t know if this is a bug or some error only I experience? But yeah… super minor concern.
Obviously this type of thing is made for main vocals (singing), but the biggest way I use it is with audio samples to change the tonality, by fixing the key to correct pitch of the song, but playing with the formant shift, width (detune), and dry/wet balance (0 formant vs formant shifting). This can add a lot of flavor and originality in an era where so many people are sourcing samples from the same places. It can really alter the overall feel in a notable way.
There are two vocal samples used throughout the track that are probably my favorite component to the beat. I called them space voice and cry voice, as neither are actual words, but just little sounds being made (like an uuuuooo ewwww, and ahhh haaa). This plug in made them what they are. I have the formant +7 on the space voice and -6 on the cry voice. I also gently played with the width for detuning. It made them feel like the two samples came from the same world.
Vocal Processing
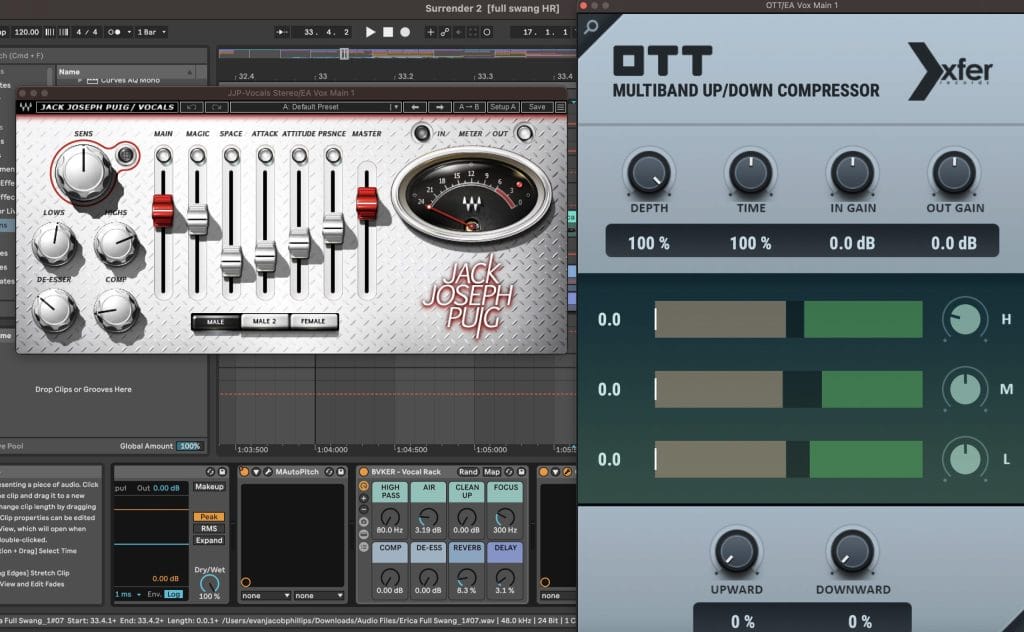
Erica Ambrin, the singer featured on the track, sent me her dry vocals (which were awesome). My original plan was to chop up what she gave me, super duper process them, and use a formant shift heavily up or down. Which I eventually did do at the end (resampled, chopped, formant down). But her vocals, the lyrics, delivery, tone, etc., were too pretty to not use in full, as is, not reinterpreted.
There is nothing super complex about the processing. The chain is pretty standard and straight forward. There’s no real tricks to it. Just cleaning and beefing up. I hardly tweaked any settings.
Ableton EQ Eight -> Ableton De-Esser -> Melda Productions M Auto Pitch -> Bvker Vocal Rack -> Xfer OTT -> Waves JJP Vocals Stereo
I didn’t do much on EQ besides cut below 85HZ. The De-Esser is default ess reduction. The pitch correction was just for safety (I don’t think it altered anything, as the takes are in key as recorded, because she’s talented), I added some minor Air, Reverb, and Delay on the Bvker Rack (great and simple tool), put both the downward and upward levels to 0% on the OTT and cut some high that made sorta harsh hiss I didn’t want, and then finished it with the JJP where I brought the High’s back up, but without that OTT hiss to it. The JJP plugin is a monster. It does it all. Layered with the Bvker and OTT there are a lot of simple and quick ways to really boost a vocal take.
Live Instrument Add’s
I got some additional musicianship on this track from the very talented Kerry Conlan of Parson Jones. He played some guitar and xylophone runs that were magical. I liked everything he did so much it made it hard to pick what to use and where. That’s also why this song has an extended instrumental run at the end. I wanted to let the beat shine as complimented by the guitar and xylo. I used the same processing chains as the synths to make everything feel like it came from the same world.
Workflow + Feel
As with most of my work, I started with a 4 bar loop (more often it’s actually an 8 bar loop). I didn’t arrange as I went, at least not at first. I made everything I thought I needed in this main loop until it sounded totally full, or even too full, with everything playing at once. Then I deconstructed that fully loaded loop and began arranging an actual song from the elements.
As it shapes up from there, little details and ear candy items get added (downsweeps, chimes, efx wetness up, etc.). I keep the original loop in the same session, at the front. I use empty space before the official start of the track, and change the “start” to a locator where the song arrangement begins.
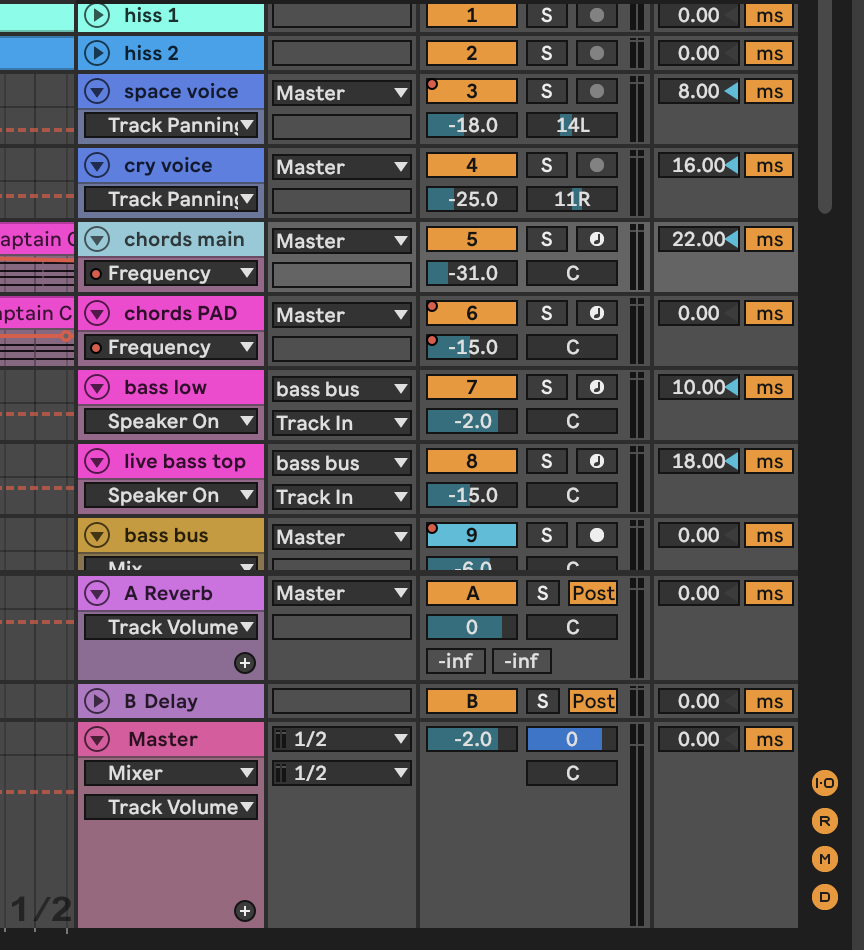
I also used two different tape hisses panned left and right running in the background, and some record crackling, all applied subtly, to make it feel warmer, more analog, and more human.
Quick Fire Tips For Making This Genre
Tip 1: This whole aesthetic is about groove. To capture the right slump, it’s really important to use empty space and not clutter the track and make it feel too full or busy with things sitting in the same rhythmic space. The timing and swing is critical to the feeling and allows individual tracks to occupy unconventional pockets. On their own, they may seem off–early or late–but it’s how they work together. Operate on “Dilla time” (if you don’t know what that is, learn about it immediately). Quantize can be your enemy when creating this sound–Do not tightly quantize, or have things perfectly on grid, and in some cases, don’t quantize at all. Let the rhythms exist in a natural state–some a bit sloppy, some maybe more precise. You can manually drag audio or midi info sooner or later, or you can enable the “D” button (delay) in Ableton to control how many milliseconds forward or back a track is shifted. I do both without any clear methodology.
Remember, this is about feeling, so rely more on your ears than your eyes. It might not follow the rules as you’ve learned them and that’s okay it sounds and feels right.
Tip 2: The bass!! The bass must slap. Having bass layers makes a huge difference.
For this track, I wanted the bass to feel like a live bass to the listener but still possess all of the qualities of the standard low end of House and Electronic music. It didn’t take a whole lot to achieve that. There are two bass tracks playing together (sometimes it may take more), both from Serum.. One is the stock Serum BS Sub to get the low low. The second is a Serum download from Splice by Sample Magic called Bass Suede (sounds more live).
The key is to make sure the EQ balance between them is clear. The live sounding bass is filling more of the low to mid frequency range. The sub bass used to make it all sound thick and full starts to fall off around 185HZ, but it’s really living in the 30-100 range. Together they make one really dynamic bass bus.
Also, again timing is everything. These bass grooves live deep and late in the pocket.
Tip 3: Drums are the primary component to the overall aesthetic. Think of them in three parts– sound selection + timing + tempo.
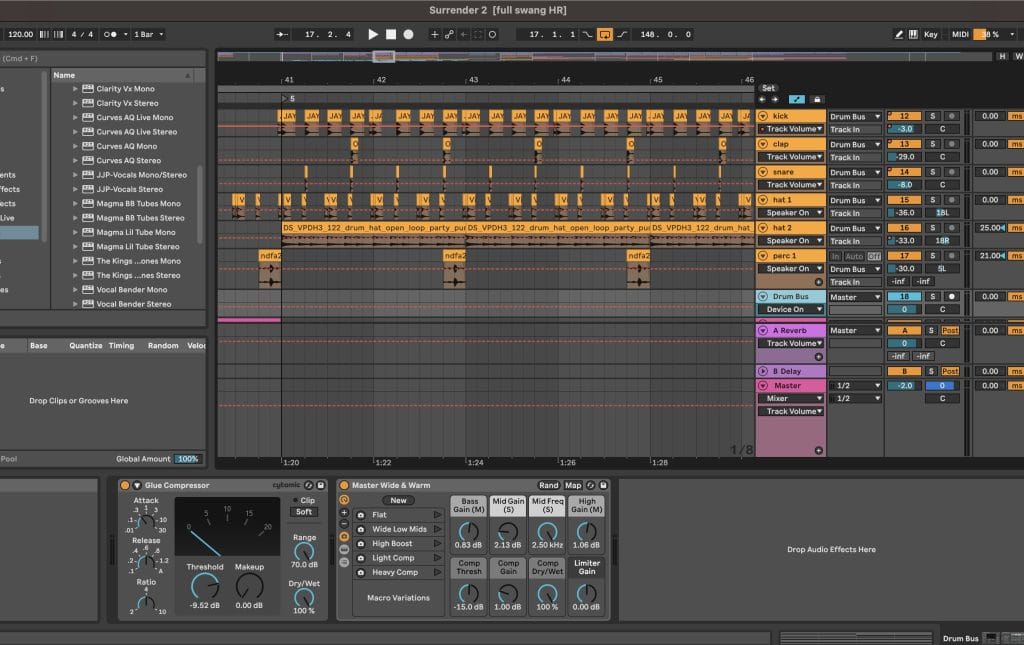
I don’t think I used a single sound from any pack that was designed specifically for House. I wanted organic sounding drums. More rounded and muted style kicks tend to work best. If you can’t find a kick sound you love, try aggressively rolling off the high end on other kicks you’ve used. This is what a lot of people used to do on older analog machines like the MPC or ASR. It’s a boom bap Hip Hop producer technique that still works and is really the evolutionary inspiration to the whole style. Combining rim shots with natural sounding claps is a must versus using the more popular claps and snares we are used to hearing (experiment with where they land in relationship to each other, timing can be way off, inconsistent, and sound great). Lastly, shakers and open hats are key to this sound. The longer sounds in tighter spaces work best.
Again timing is everything. If there isn’t a notable slump to the groove, it ain’t it. No straight drums (actually maybe one or two sounds to serve as a sort of audio glue backbone). The kick + snare/clap relationship is where to start. They should have a hiccup jerky feel to them, which can be done by moving the kick late off grid, or the snare/clap early on grid, or late if you leave the kick on grid. It doesn’t matter. It’s about how all of it balances together. If not hand playing–Move hats and perc sounds way late, where you can tell it’s not good, way way too late, then close your eyes, slowly nudge back to something more tight, but still loose in the pocket, until it works. Get this established with a main hat or perc sound, then experiment with the other of the high end frequency drum sounds (don’t use the exact same placement, try odd placements, even if only once every 2-4 bars).
BPM becomes critical. Swing can start to feel weird if it’s a key driver to the composition (used on most of the track) and the tempo feels rushed with the swing (granted any tempo can have some swing to it). I pushed this one as fast as possible to keep it dancey. I maxed out at 120 BPM. Any faster felt rushed. Keep in mind, DJs will probably play the track +2-4%. It easily could have been 116-118 and maybe felt a little more natural, but I liked it quicker. Overall, this style lives in the 110-120 BPM range, but can dip or go above so.
Also pan your damn drums to make it feel more organic and real. I usually put at least one hat sound 15-25 to the left, and one perc 15-25 to the right, to emulate a real drum kit or drum section on stage.
Lastly, Glue Compression and processing on the drum bus goes a long way to make them feel cohesive and can also help add to that slumpy sidechain pump vibe. The exact settings vary, but in the end you want that meter pumping between 0-5, without hitting 5. Adjust the Threshold and Makeup knobs to hit that sweet spot. The stock Ableton plugin made for Mastering called Wide & Warm is a gem on the Drum Bus (minimally tweaked to preference).
Tip 4: Let kick and bass lead in the mix–like even more so than normal. Make sure they are sidechained in a way that has that pumping feeling (think Kaytranda or even classic French House or Big Room EDM). This adds to that hiccup slump vibe.
Tip 5: Less is more. When in doubt, take things away, pull things out, use less elements. Let it breathe.
BONUS TIP: Vocals and live musicians. Use a vocalist, even if sparingly. Add 1 or 2 real live instruments (audio files from humans) if possible. Humanize things.
Surrender is out now on Mise En Place
Follow Truthlive on Instagram
The post How It Was Made: Truthlive feat. Erica Ambrin – Surrender appeared first on Magnetic Magazine.