


Finalfix‘s SoundCloud bio is exactly what you need to know about his music: “DRUM AND BASS IN YA FACE”.
Today, he returns to Dutch heavyweight label Blackout Music with his newest EP, “Full Metal Halo“. It’s a fascinating five-tracker that highlights everything we’ve come to know and love about Finalfix: crispy drums, eerie atmospheres, and dirty, grimy reese basses. It’s a drum & bass lover’s paradise, and truly as “IN YA FACE” as he claims all of his music to be.
On this edition of our How It Was Made series, Finalfix is taking us deep into the creation of the EP’s title track. While most of the EP is pure neurofunk grit, this cut focuses more on the melodic side of things, with gliding synth chords and rapid-fire basses and arps taking center stage. It still features the dirt that we’ve come to expect from Finalfix, but that dirt perfectly complements everything else going on. It’s an outstanding effort from a producer who we’re super lucky to be able to learn a little more from today.
Take a listen to the full EP below, and read on to see just how Finalfix accomplished drum & bass perfection.
Let’s dive into ‘Full Metal Halo’, the title track of my latest EP! As you can tell from the DAW screenshot, I don’t really put a lot of effort into organizing, naming or coloring the files. One of the fun parts about working inside FL Studio, is that you have the freedom to place stuff where you want. As long as it sounds good and the structure makes sense to you, it doesn’t matter what your project looks like.
I started working on Full Metal Halo in 2022 after going through some of my earliest unreleased projects from 2011-2012. I found an old beat that I’d made and it had this chord progression that I really loved and wanted to use in a new tune. After working on the track for a little while, I stemmed out what was then a rough sketch because I wanted to send it to someone special to collaborate together. The collab didn’t work out in the end, and I decided to use the stems and finish the tune myself. That is why you see a lot of the samples in the screenshot have “FMH” in their name. Those were actually the first stems.
Harmor

Harmor is one of my go-to synths and it allows for precise control over pitch, filters, unison effects and much more. Its clear interface makes it easy to tweak and sculpt sounds, while the sub-harmonic and unison pitch-thickness faders let you create wide, full textures without much effort. I really love using those particular faders.
For Full Metal Halo’s main lead chords, I used a saw wave as the foundation, applied a low-pass filter, and adjusted the sub-harmonic fader for extra depth. I set the unison order to “2” and automated both unison panning and pitch thickness to give movement and space. When automating parameters inside your synth, you have the opportunity to morph the sound in a way that serves the song arrangement, without the need for layering more FX samples on top like sweeps or reverse FX. As I intend to build tension towards the switch-up, I automate the parameters accordingly, resulting in a melodic lead that fulfills its role in the arrangement. After that, there is still plenty of fun to be had with FX and ear candy.
It works really well with chords. The low-pass filter combined with slight distortion can help your sound sit better in the mix as well, as full-spectrum sounds often bring high frequency energy with them that might sound good at first, but could actually be mixed and focused a bit better.
Fruity Balance
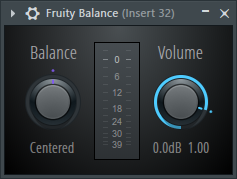
I know what you’re thinking: “really, a volume knob?”. But despite its simplicity, it’s incredibly useful for creating space and clarity in dense productions. I like how quickly it responds to automation clips, it does the job for me. With tracks that are this loud and filled with sounds, it’s absolutely vital to treat the project like a jigsaw puzzle, avoiding all unnecessary overlap. If I don’t do that, the sounds start to fall apart and distort in unpleasant ways. Especially when mixing into a clipper.
For producers making similar high-energy electronic tracks in FL Studio, Fruity Balance is a great tool for gaining precise control over your mix. Experiment with automation to highlight key elements in your track, and don’t underestimate the power of simple gain adjustments in achieving a professional sound. Sometimes it’s the old simple plugin you need instead of the new complex one.
Mellotron (Arturia)
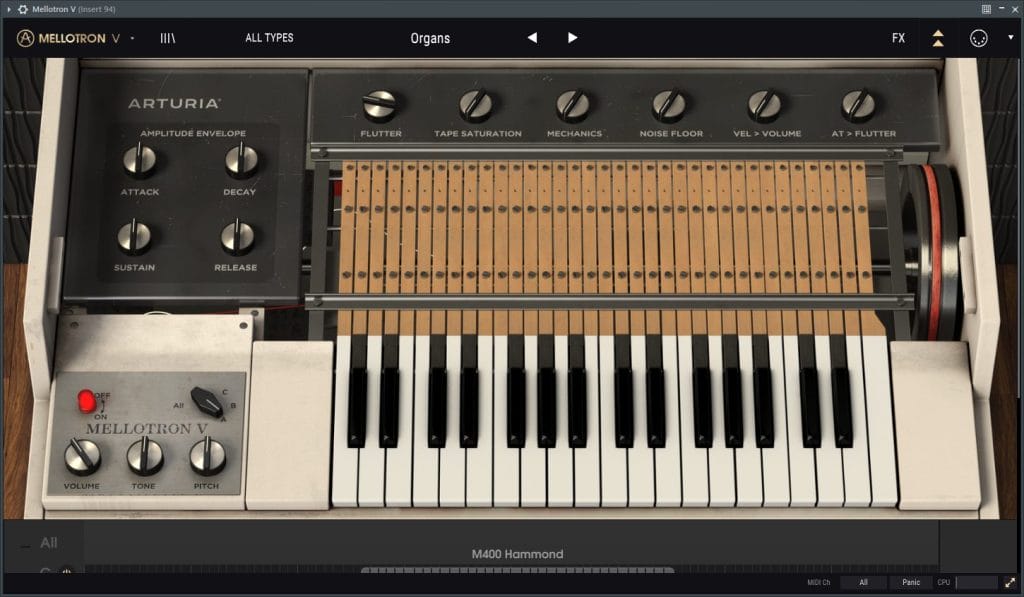
The Mellotron is a classic tape-based sampler that emulates the sound of real instruments. I mainly use the plugin for its ability to bring organic character to digital productions. Despite its retro roots, it’s versatile enough to fit in my modern tracks, giving them a distinctive edge.
In Full Metal Halo, I used the Mellotron to add melodic old-sounding sections. The tune sounded so technical and synth-heavy, that I wanted to have a few sections in there that make it feel like it has some soul or life as well.
I played a variation of the main chord progression with the “Organs” preset and then I added a sample of some vinyl noise crackles on top of it. Boom! Instantly sounded ancient and meaningful.
Fruity Parametric EQ 2

This equalizer is another FL Studio stock-plugin and just like the simple gain knob, the EQ is an extremely important tool whose versatility should not be overlooked. This particular one has 7 bands and a real-time frequency spectrum display that shows the frequencies and their presence in the form of color-intensity.
Creating EQ automations throughout the track and ducking certain frequencies in your synths or pads or anything that overlaps with the sound you want to let shine in the moment, is absolutely necessary when working with a lot of sounds. Since the tune is constantly switching up, some elements need different frequency balances depending on the new sounds that get layered on top of them. For the more constant sounds like main snares to sound right, it usually requires me to do multiple long sessions of EQing.
When it comes to explaining my productions and tricks, I always emphasize the importance of strictly considering plugins as tools to get closer to your artistic vision for the track. In the same way that you don’t look at the basketball, the frisbee, or your hands, but at your target when throwing. When using an EQ, use it because you know what you want to achieve, not because your EQ curve or wave form is supposed to look a certain way. Experimentation and exploration are big parts of the process, but having clear intent and a vision is very powerful as well.

Quick Fire Tips for Making Drum & Bass
1. You don’t need to know all the tricks in the book, because you can get awesome results with good ideas and perseverance.
2. Conceptual thinking is king. I believe that an idea holds more power than any plugin or technique. The sound always comes forth from the idea or impulse before it, and that idea shapes and colors your sound more than any plugin ever will.
3. Try to get things sounding loud if you can, but prioritize the quality of your mix over loudness. You’ll thank yourself later.
4. Use the appropriate amount of effort necessary to get the results you want. You will find out what that appropriate amount was once you get there.
5. Believe in yourself and your personal taste! Your confidence will show itself in your music.
Stream “Full Metal Halo” here.
The post How It Was Made: Finalfix – Full Metal Halo (Drum & Bass – Blackout Music) appeared first on Magnetic Magazine.